A Little Something

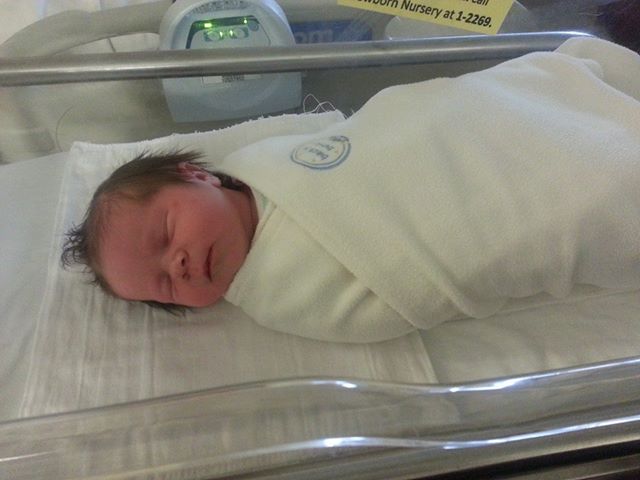
I know. Bad blogger. Bad. Blogger. I have no excuse. Just a confession. I have fallen madly in love and just couldn’t tear myself away from my new dearest. No need to tell my husband. He is smitten as well. Meet Pyper Eden. She insists on being held all the time and I am happy to oblige her. Being a Nana is the best thing in the whole world.

pyper

Since mommy is able to drive and back on her feet, I guess it is time to get back into a routine and stop neglecting all of my other duties.

I have a few things to share, even though it is very difficult for me to get into creative mode with so many things to distract me. Since I haven’t taken any photo’s yet, I’ll share some “extra” projects that haven’t made it to the blog yet.

Hearts a Flutter

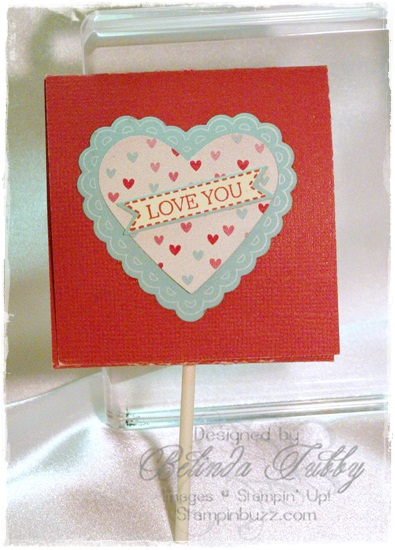
This is a lollipop cover. I’ll try to put together a tutorial for these with the dimensions. They are really easy. I will probably make some version of these for Aubrey’s school party this year. Quick and fun. I used the Hearts A Flutter set and framelit for this one and the More Amore from last years Spring Catalog. As luck would have it, this paper is now on the clearance rack and very inexpensive! There are some really great prints in this pack and some fun laser cut heart doilies. You can check it out at the link below.

Thanks for stopping by!

Belinda


Stampin’ Stuff

Stamps

Hearts a Flutter ~ Itty Bitty Banners

Ink

Real Red ~ Whisper White

Paper

Pool Party ~ Very Vanilla ~ Primrose Petals Core’dinations ~ More Amore DSP

Fun Stuff

Simply Scored Scoring tool ~ Big Shot ~ Bitty Banners framelits ~ Hearts a Flutter framelits ~ Lollipop


Sweet Treats

Everyone loves getting candy treats during the Christmas season. Here are three different options for packaging your sweet treats!

12 gifts of christmas

I used the Petite Pocket die to create this cute little pouch. It really doesn’t get much easier than this for a quick project, and it’s the perfect size for a variety of candies!

12 gifts of christmas

I love our 1 x 8 cello bags for candy gifts. This topper was fun to make using the smaller circle scallop punch. I just snipped apart the layers and added some tiny punched circles for ornaments. Crystal effects was used to make them shine!

Tags till Christmas

Finally, gift number 5 in this series is this fun little box which will hold quite a few candies. It is a six sided box, made using the Milk Carton die! Lots of fun!

Thanks for stopping by!

Belinda


Stocking Builder Rudolph

Stocking Builder

Isn’t this clever? I saw this little Rudolph on our demonstrator sharing site, made by Sharon George. So cute! It is done using the Stocking Builder punch. I added it to a candy holder made with the Two Tags die. The tags are embossed using the new Snow Burst Textured Impressions embossing folder. Fun, Fun!

Belinda


Stampin’ Stuff

Paper

Cherry Cobbler ~ Chocolate Chip ~ Crumb Cake ~ Basic Black ~ Red Glimmer paper

Fun Stuff

Big Shot ~ Stocking Builder punch ~ 1/8″ Circle Punch ~ Itty Bitty Shapes Punch ~ Two Tags die ~ Swirls Scribbles Sizzlet ~ Riding Hood Red taffeta ribbon ~ gold cord


Two Tags Candy Holder

two tags halloween candy holder

Here is a cute little Halloween treat holder. You can stack smaller candies inside, or use it as a band around a bundle of longer candy. These are quick and easy. Just cut two of the larger tags, using the Two Tags die and the Big Shot machine. Emboss the tags if you like, and then glue them together on the bottom fold. Fold the top half of the tags up to form a triangle and tie at the top. Fun stuff!

Thanks for stopping by!

Belinda


Stampin Supplies

Paper

Pumpkin Pie ~ Rich Razzleberry ~ Daffodil Delight ~ Basic Black ~ Retired DSP

Fun Stuff

Big Shot ~ Two Tags Die ~ Spider Web TEF ~ Owl Builder punch ~ 1 3/8″ Circle punch ~ 1/8″ Basic Black grosgrain ribbon


Candy Bar Wrapper Video!

Halloween candy bar wrapper

Oh My! I have managed to create my first video, but I had no idea just how involved it would be. The whole process has been very time consuming for me, because I started from scratch! I had to learn how to use the camera and figure out how to mount it upside down over my desk, figure out lighting, learn editing software, you tube, and then how to embed it into my blog! So if you have been wondering where I have been, between this adventure, a few big family events and a stomach bug …… There were days that I was wondering the same thing myself! It’s good to be back!

Isn’t this little bat cute? I saw one that used a pattern  that was printed off and then cut out. I wasn’t sure how the ink would show up on black paper, but I also knew it would be easy to do using punches! So here is the final result of several adventures over the last couple of weeks.

My first video presentation for my blog.  I should explain that I hate most of it! Every frame is a lesson in what NOT to do next time, but it took so long to get to this point, there was no way that I was going to start over! The project is cute and fun though, and the video explains it well enough. I will be adding more videos and hopefully they will get better as I go along. I hope you enjoy it!

Thanks for stopping by!

Belinda


Stampin Supplies

Paper

Basic Black ~ Whisper White

Fun Stuff

Simply Scored Scoring tool ~ 2 1/2″ Circle Punch ~ 1 3/4″ Circle Punch ~ Owl Builder punch ~ 5 Petal Punch


Oldie but Goodie!

Carrot boxes

I love these Carrot Boxes!

These are quick and fun little Easter boxes that we made  at stamp camp this month.  They have been around for awhile, but I bring them back often. They’re just so stinkin’ cute!

carrot box

Print the Carrot Box Pattern onto your card stock

carrot box

Cut on solid lines

carrot box

Score on dotted lines.

carrot box

Stamp using Whisper White Craft Ink.

I used flowers from Cheep Talk and Playful Petals sets, but any spring type image would be cute. You could also stamp tone on tone instead of white or even use bleach. I would place edibles in a cello or plastic bag if using bleach.

Stamp on the print free side of the card stock, the score lines will be on the inside of your box.

carrot box

Add glue to the slim flap. The glue will go on the outside or stamped side and then fold into the box.

carrot box

The Tombow Multi glue grabs quickly and makes a very sturdy bond. You could also use sticky strip tape.

carrot box

Punch holes through both flaps using the 1/8th hole punch and then add strands of curling ribbon to each hole and curl. I used three strands through each hole, each strand about 12 inches long.

Thanks for stopping by!

Belinda