Sale-A-Bration Banner Blast

follow my heart

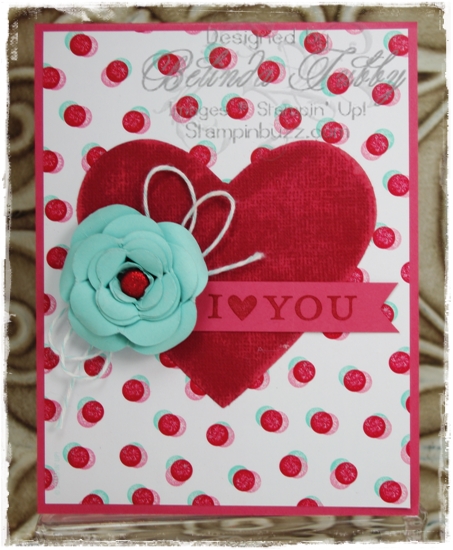
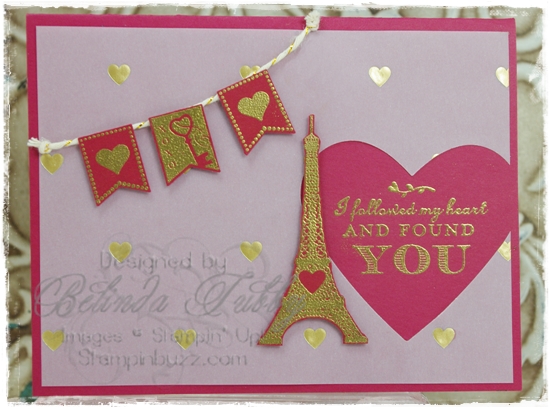
Sale-A-Bration starts tomorrow! I used one of the free items that you can earn during this favorite Stampin’ Up! promotion. The two banners with the hearts are from the Banner Blast set that has a matching punch. The gold heart vellum is from the new Spring Occasions catalog.

I embossed the sentiment and then cut the heart with a framelit and layered the vellum over the sentiment. All of the images are stamped in Versamark ink and then coated with gold embossing powder and heat embossed. Very old school valentine and technique, with the red and gold, but I kind of like it!

Thanks for looking!

Belinda


Stampin’ Stuff

Stamps

Follow My Heart ~ Banner Blast

Ink

Versamark

Paper

Cherry Cobbler ~ Fancy Foil Designer Vellum

Fun Stuff

Big Shot ~ Hearts framelits ~ Banner Punch ~ Gold embossing powder ~ Embossing Heat Tool ~ Gold bakers twine


Spiral Flower Die

Spiral flower die

I played with some fun new things from the new Occasions catalog! First, I lOVE this new DSP paper stack called Fresh Prints. I love these patterns and colors, and this is my favorite from the pack, I think (today anyway)!

This is the first flower I have made with the new Spiral Flower Die. These are so easy to make! Just run them through the Big Shot and then roll them into a flower. So much fun! I unmounted the wheel from the Clearance Rack and that gave me a bunch of cool Valentine sentiments. Easy Peasy.

Thanks for dropping by today!

Belinda


Stampin’ Stuff

Stamps

I {love} Love wheel

Ink

Cherry Cobbler

Paper

Regals Core’dinations ~ Primrose Petals ~ Fresh Prints DSP stack

Fun Stuff

Big Shot ~ Hearts framelits ~ Spiral Flower Die ~ Sanding System ~ Brights Glimmer Brads ~ Pool party bakers twine


Hello Lovely

Hello Lovely

The stamp set I used for this card is called Hello Lovely. In spite of that, the Hardwood background stamp gives it a masculine feel and I love the trendy look that the Hello Lovely set lends to it. Inside the card is a die cut I {heart} U. There are a bunch of fun little die cuts like these that come with the two flip card thinlits. Lots of fun goodies!

Thanks for looking today!

Belinda


Stampin’ Stuff

Stamps

Hello Lovely ~ Hardwood

Ink

Early Espresso ~ Cherry Cobbler

Paper

Cherry Cobbler Core’dinations ~ Neutrals Core’dinations ~ Early Espresso ~ Crumb Cake

Fun Stuff

Big Shot ~ Hearts framelits ~ Circle Card Thinlets ~ Label Card Thinlets


Be Merry Gift Box

punchboardbox8

Today I have tutorial to share. This is a gift box made from a 12 x 12 piece of card stock. I used our Natural Composition specialty DSP because it is a thicker card stock and it has beautifully embossed images on it, so your box is already decorated. After a little scoring and punching with the Envelope punch board, you make 4 simple cuts and then fold your box and tie it up. Add a quick tag for a beautiful gift presentation. The finished box is 5 1/2″ square and 2 3/4″ deep. Enjoy the tutorial!

Begin with a 12 x 12 piece of card stock or dsp. Line each side of the cs at 4 inches, punch and then score as far as you can on the board.

Punchboard Box

It won’t score all the way across. Just score as far as you can, because the next step will finish the score line for you. In the picture below you can see where the lines don’t quite meet.

punchboardbox2

Flip the card stock over and do the same thing from the back. Line the edge at 4 inches and score down till your lines intersect with the score lines from the other side. These lines will form the box bottom. The lines that extend beyond the box bottom to the edges of the card stock, will form your box sides.

punchboardbox3
Line the bottom edge of the v punch with the scoring groove on the punch board as shown below and score again to create your box side and flap. You are still scoring from the back.

punchboardbox4

Cut in from each side as shown to create your flap, which will allow the box to fold in. Be sure to only cut up to the score line.

punchboardbox5

When you are finished cutting, opposite sides of the box should have 2 side flaps, which will fold in to secure the sides of the box. The opposing sides will not have side flaps, only a flap which will help to form the box top. Add adhesive to each of the flaps and fold in to form the box.

punchboardbox6

Fold the top flaps in to close the box. You can secure with adhesive if you like. I add a punched circle under the bottom two flaps to make the box a little sturdier. Finish it off with a bow and tag!

punchboardbox7

Thanks for stopping by today!

Belinda


Stampin’ Stuff

Stamps

Be Merry

Ink

Old Olive ~ Red Sharpie marker

Paper

Whisper White ~ Natural Composition DSP

Fun Stuff

Big Shot ~ Chalk Talk framelits ~ Basic Pearls ~ Cherry Cobbler 1″ grosgrain ribbon


Be Merry

Be Merry

This is a quick and easy card using one of our single stamps called Be Merry.  It is very similar to our tag from the Chalk Talk set and so I was able to use the Chalk Talk framelit to cut the tag opening. I stamped the image (masking off the to-from at the bottom) I cut it out by hand (it is larger than the framelit) and then I slipped the top of the cut piece under just the metal piece that makes the cut out. The rest of the card piece was laying on top of the framelit and I ran it through the Big Shot.

I added a big bow using the 1″ grosgrain from the Holiday Catalog and a few Candy dots to fill in the open space at the bottom. Quick and easy!

Belinda


Stampin’ Stuff

Stamps

Be Merry

Ink

Cherry Cobbler ~ Old Olive Marker

Paper

Cherry Cobbler ~ Whisper White ~ Season of Style DSP

Fun Stuff

Big Shot ~ Chalk Talk framelits ~ Cherry Cobbler 1″ grosgrain ~ Regals Candy Dots

Cheers!

Cheers

Here is a festive card for the Holidays! I wish the camera could catch the sparkle better, it is so much prettier in person. I love our glimmer paper for that reason, you get the glitter without the mess and the sparkle is just FABULOUS. In my head that sounded a lot like Jim Carrey with a finger snap at the end! The little brad is one of our glimmer brads, and even though the bow, ink and paper are Cherry Cobbler, somehow the red glimmer paper works and doesn’t look too “red”.

I hope you get to stamp something Christmasy today! [Yes, that is a word. It’s not in the dictionary, but it should be. Cheery, snowy, Christmasy. (Spelling may vary depending on my mood)]

Belinda


Stampin’ Stuff

Stamps

Cheers

Ink

Gumball Green Marker ~ Cherry Cobbler Marker

Paper

Gumball Green ~ Whisper White ~ Season of Style paper stack ~ Red Glimmer paper

Fun Stuff

Big Shot ~ Festive Flurry framelits ~ 2 1/2″ Circle punch ~ Cherry Cobbler seam binding ~ Brights Glimmer Brads


Joyful Christmas

Joyful Christmas

I have had to emboss this set every time I have used it. It just doesn’t need much else and the heat embossing is so pretty. The flowers and leaves are hand cut. That seems like a lot of work, but they really cut pretty quickly. I just popped them on a dry embossed background (retired folder) to finish the card.

I hope you get to stamp today!

Belinda


Stampin’ Stuff

Stamps

Joyful Christmas

Ink

Versamark

Paper

Whisper White ~ Cherry Cobbler ~ Garden Green

Fun Stuff

Big Shot ~ Apothecary Accents Framelits ~ Lacy Brocade TIEF ~ Gold embossing powder ~ Embossing Heat Tool ~ Basic Pearls


Make a Mitten

Make a Mitten Stampin up
This is a variation of a card I posted for our Christmas Stamp a Stack. Love the Sweater Trim from the Holiday Catalog. I used a frayed piece of it on the mittens. I like this layout, it makes a  quick and easy Christmas card.

Thanks for stopping by!

Belinda


Stampin Supplies

Stamps

Make a Mitten ~ Petite Pairs

Ink

Baja Breeze ~ Cherry Cobbler

Paper

Baja Breeze ~ Cherry Cobbler ~ Whisper White ~ Snow Festival

Fun Stuff

Big Shot ~ Delicate Doily Sizzlet Die ~ 2 1/2″ Circle Punch ~ Cherry Cobbler Sweater Trim