Halloween Bash and Tuesday Specials!

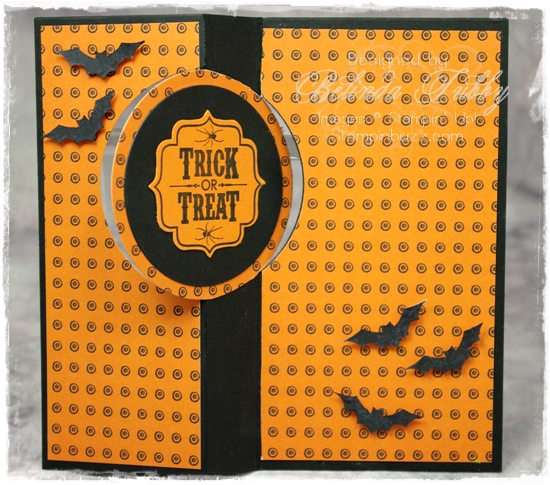
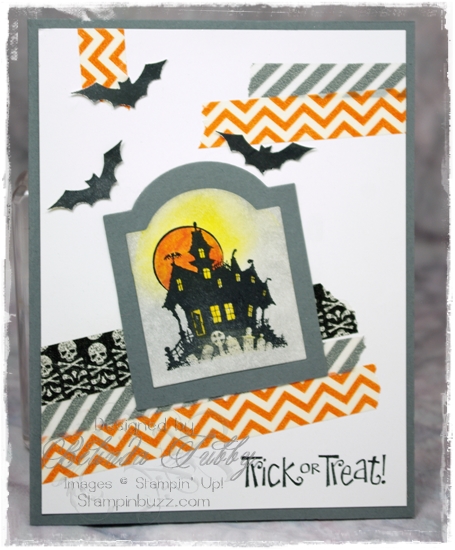
It’s starting to feel like Halloween! I know, most people don’t get excited about chilly, rainy days; but I adore them! Perfect. Halloween. Weather.

Halloweenbash

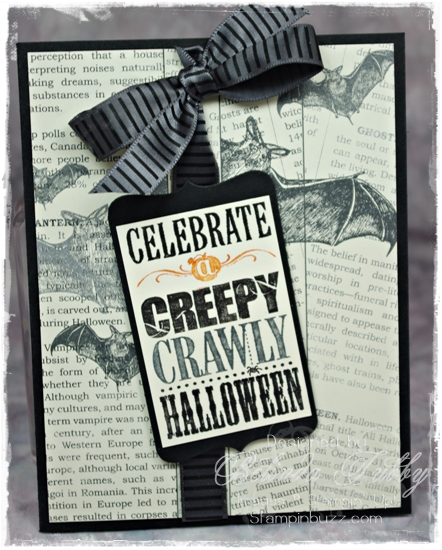
In honor of this lovely weather (yes, lovely), I have a spooky card for you. I thought these devilishly, eerie bats were the perfect starting point and all they really needed was some fabulous word art to finish the theme. I get to spend the day creating more creepy delights for you. LOVE! Before I go, I wanted to remind you that today is Tuesday so check out the new weekly specials below……

Tuesday’s Weekly Deals

Shop my online store for this weeks deals! Specials end October 21st.

Tuesday Specials 10/15/13

Belinda


Stampin Supplies

Stamps

Halloween Bash

Ink

Basic Black marker ~ Pumpkin Pie Marker ~ Basic Gray Marker

Paper

Basic Black ~ Very Vanilla ~ Witches Brew DSP

Fun Stuff

Decorative Label punch ~ Retired Ribbon


Best of Halloween Flip Card

Halloween flip card

Here is a Spooky flip card that I made using the new Circle Card Thinlets, a die that cuts and scores this fun fold! To get the DSP to line up nicely, I just used the thinlet to cut it. Then I trimmed it down to fit the card. The image is stamped on a white circle and then sponged to add the color. I cut the bats from an image in the Halloween Bash set.

Halloween flip card

I hope you get to stamp today!

Belinda


Stampin Supplies

Stamps

Best of Halloween ~ Halloween Bash ~ Tags 4 You

Ink

Black StazOn ~ Daffodil Delight ~ Pumpkin Pie ~ Night of Navy

Paper

Basic Black ~ Pumpkin Pie ~ Whisper White ~ Witches Brew DSP

Fun Stuff

Big Shot ~ Circle Card Thinlets ~ Circles Collection Framelits ~ Label Bracket punch ~ 2 1/2″ Circle punch ~ Sponges ~ Sponge Daubers

World Card Making Day

Best of Halloween

Today is World Card Making day. I hope you get a chance to stamp today! If you do, be sure and snap a picture of your card and send it to Stampin’ Up! to be entered to win a prize

There are two ways to enter:

  • E-mail a photo of a card, or of you making a card, made with Stampin’ Up! product on World Cardmaking Day to wcmd2013@stampinup.com.
  • Post a photo of a card, or of you making a card, made with Stampin’ Up! product on World Cardmaking Day on Instagram. Mention us by typing @stampinup and use the hashtag #wcmd2013 in the description.

I am getting addicted to the Washi Tape! They are just fun to play with and mix and match. I really love how they make it easy to “fill in” anywhere your design “needs something”.  For a smaller image like this, they are the perfect background. I handcut the little bats from another image in the Halloween Bash set. I love the little bat image and have used it on several projects. The tombstone background is a Windows framelit piece that has 3 of the sides cut down.

Belinda


 Stampin Stuff

Stamps

Best of Halloween ~ Halloween Bash

Ink

Black StazOn ~ Tangerine Tango ~ Basic Gray ~ Daffodil Delight

Paper

Basic Gray ~ Whisper White

Fun Stuff

Big Shot ~ Window Frames framelits ~ Witches Brew Washi Tape ~ Epic Day Washi Tape ~ Sponges

Chalk Talk

Chalk Talk

The new Annual Catalog is officially live and full of wonderful new things. The Chalk Talk set is one of my favorites! I am kind of hooked on this technique (Faux Chalk) so it is wonderful to have some images that make it quick and easy!

The fussiest part of this card is the bow. I just sponged some “chalk” on Basic Black card stock. You could use chalk if you have it, but I prefer our Whisper White craft pad and a sponge.

I stamped and cut out the image (Black StazOn on Whisper white). There are framelits for this set! Next, I sponged a doily with tea stain and added an embossed border. The vanilla flowers have been smushed  into the primrose petal pad to add some color (yes, smushed is the technical term). Love how this one turned out.

I hope you get to stamp today!

Belinda


Stampin Supplies

Stamps

Chalk Talk

Ink

Black StazOn ~ Whisper White Craft ~ Primrose Petals

Paper

Basic Black ~ Primrose Petals ~ Whisper White

Fun Stuff

Big Shot ~ Chalk Talk Framelits ~ Large Scallop Edgelit ~ Delicate Designs EF ~ Tea Lace Paper Doilies ~ Very Vanilla seam binding ~ Tea Stain distress ink ~ Vanilla flower trim


Santa Punch Art

petal cone santa

I am sure you are wondering what in the world I am doing posting a Santa punch art tutorial in May! For those who are signed up for my newsletter, I am doing a series through Christmas geared toward organizing and preparing for the holidays early. Each newsletter has a section on getting ready for the holidays and each month on the 25th I am going to dedicate a post here with the same theme. The idea is to set aside specific day for working on creating the most fabulous holiday we can imagine. The series theme is A Pinterest Christmas, so you know we have a million ideas on that!  I chose the 25th of each month. Easy to remember. If you would like to play along, just sign up for my newsletter for the entire series. You can sign up by filling out the form in my side bar.

I was asked to share a tutorial for this punch art  Santa as part of the series. Since this ornament punch is retiring at the end of this month, I decided that I better hurry and fit it in now! Originally I used it on this petal cone die box (also retiring, which makes me very sad!). This tutorial shows an additional step or two for creating a hat for the santa.

Picture 40

You will need to punch the pieces as shown in this photo. Emboss a Whisper White piece of card stock using the Perfect Polka dot folder and punch an ornament, a large oval, two wings from the Bird Builder punch and the circle from Itty Bitty shapes. Then punch a Cherry Cobbler pennant with the Pennant builder punch, Blush Blossom Itty Bitty circle and 1 3/4″ circle and then two 1/4″ Basic Black circles. When you are punching the wings for the mustache, punch one and then flip the card stock over and punch the debossed side. This way you will have two wings pointing different directions.

Picture 37

Create a handle for the Large Oval piece and use the 1 3/4″ circle punch to trim away part of the Large Oval as shown.

Picture 39

Picture 43

Attach the partial oval piece to the pink circle and sponge on some cheeks using a sponge dauber and Blushing Bride ink.

Picture 44

Trim off the top of the ornament  and attach as shown.

Picture 45

Add the two wings to form the mustache. I did not pop these up for this sample, but I think I will from now on, it gives it more definition. Bend the pennant piece over as shown to form the hat.

Picture 47

Add the white circle to make a pom for the hat and attach as shown.

Picture 48

Finish the punch art piece by adding commas to the eyes, using a white gel pen.

Thanks for stopping by

Belinda


Frankenstein Treat Box Tutorial

Fancy Favor Frankenstein Box

Create an adorable Frankenstein treat container using the Fancy Favor box die. Cut a 6 x 12 piece of Old Olive card stock and run it through the big shot with the Fancy Favor die. The die cuts and scores for you, so all you need to do is draw in the mouth and scars with a Basic Black marker. Do this on the front panel which would be the panel with the two gusseted sides. Use either liquid Tombow multi or Sticky strip adhesive to assemble the box.

frankenstein fancy favor box

Cut a strip of Basic Black card stock that is 4 x 1 1/2 inches and place it on the die so that the top is trimmed to match the decorative edge.

Frankenstein fancy favor box

Trim the scored pieces off and hand trim the lower edge of the box so that it resembles Frankenstein’s hairline.

frankenstein fancy favor box

Punch the following pieces

  • Whisper White – Two 1″ circles
  • Basic Black – Two 3/4″ circles
  • Old Olive – One 1 inch circle (cut in half) and One Modern Label piece cut at about 3/4″ and trimmed along the sides as shown

frankenstein fancy favor box

Draw a white crescent on each black circle, using the White gel pen. Glue the eyes together as shown. Sponge all of the punched pieces with crumb cake ink to make them stand out against the Old Olive box.

frankenstein fancy favor box

Cut a 1 x 11 inch piece of old olive card stock and punch with a border of your choice to create a handle. Attach the handle to the inside of the box using brads. Attach the hair, eyes and nose to the box as shown. Fill with candy or other spooky treats!

frankenstein fancy favor box

Enjoy!

Belinda


Pedaling Past

Pedaling Past

This card makes me smile, I really love this set. I am kind of all over the map in the way that I design cards, especially lately. I usually start from an inspirational point and go from there, whether it is a design layout, or a color combination, a particular paper or set or technique. I started with the paper this time. I adore this Everyday Enchantment paper from the Saleabration collection. I will be very sad when I run out! I loved these two pieces together, so I decided on the layout and then went in search of the set to go with it. I ran across my retired Pedaling Past set and that was that.

I really like the way it turned out, it reminds me of summers past. I keep hearing that Country Time lemonade music in my head when I look at it!

Happy Stampin’

Belinda


Stampin’ Stuff

Stamps

Pedaling Past

Ink

Basic Black ~ Real Red Marker

Paper

Basic Black ~ Very Vanilla ~ Everyday Enchantment DSP

Fun Stuff

Basic Black satin ribbon ~ Brights Collection designer buttons ~ Black embroidery floss


Petal Cone Santa

petal cone santa

Isn’t this a fun little Santa ornament? I used the petal cone die  for the ornament base and then punched the pieces for his head. I just folded the flaps in on this one, but if you wanted to fill it with candy; you could add a square of card stock to the bottom to seal it better. I have seen similar Santas done using a box pattern, but the die made this quick and easy!

Belinda


Stampin’ Stuff

Paper

Basic Black ~ Whisper White ~ Real Red ~ Blush Blossom ~ Silver Glimmer paper

Fun Stuff

Big Shot ~ Petal Cone die ~ Perfect Polka Dots EF ~ Extra Large Oval punch ~ Bird Builder punch ~ Ornament punch ~ 1 3/4″ Circle Punch ~ 1/2″ Circle punch ~ 1/4″ Circle punch ~ 1/8″ Circle punch ~ 1/2″ Square punch ~ 1/4″ Square punch ~ 1/8″ Basic Black taffeta ribbon ~ Sponge Daubers