Holiday Planner

Holiday Planner

 Holiday Planner

This is a fun little planner that I made to organize the information I’ll need for all of my holiday plans. Actually I use Microsoft One note to sort things out and then I’ll print things off and have a nifty little pocket organizer to carry them around with me, while I shop.

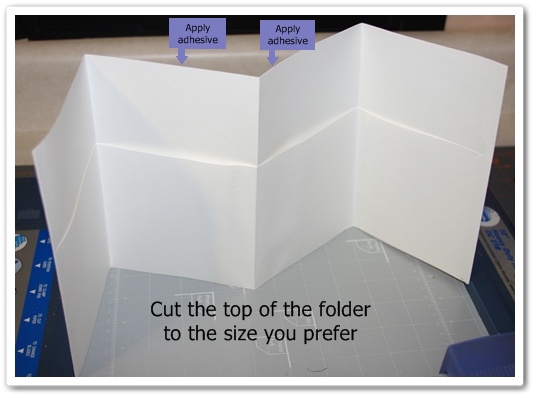
I used a regular school folder and cut it down so that it would be better sized to fit in my purse. I only had white ones on hand and so this paper from last years catalog worked best for what I had in mind. The folder is one of those simple class folders (no brads) that are available at back to school time for just pennies each. I cut about 4 inches off the top and then folded the back and front in half vertically. This gave me 4 pockets in an accordion fold.

Christmas Planner

I glued the two center pockets together from the back to make a center page rather than an accordion fold.

Organized Christmas

I  covered the front and insides with cut designer paper and stamped simple images to decorate each section. I didn’t have any red embossing powder and I wanted my titles to be opaque so I decided to cut them out with my Cricut machine. I thought it would be quick and easy. NOT! Gluing all of those skinny individual letters took forever!

planner

holiday Planner

I used the last pocket for a receipt envelope. Of course, when the envelope is overflowing, there is more room in the pocket for extras.

planner

I covered two pieces of chipboard with DSP and included some note pages and then bound it all together and added ribbon and a stamped image to decorate. This will be a fun little place to keep lists of all kinds. Wish lists, shopping lists, menus, party needs, Christmas card list.

planner

Decorating was quick and easy. Lots of punched pieces and a few cut out images.

Thanks for stopping by!

Belinda


Stampin’ Stuff

Stamps

Delightful Decorations ~ Spotlight on Christmas

Ink

Real Red ~ Baja Breeze

Paper

Real Red ~ Old Olive ~ Baja Breeze ~ Ski Slope DSP

Fun Stuff

Large Star ~ 5 Petal Flower ~ 2 3/8″ Scallop Oval Punch ~ 1 1/4″ Circle Punch ~ 1″ Circle Punch ~ 1 1/4 Square Punch ~ 1″ Square Punch ~ Red polka dot grosgrain ~ Baja Breeze satin ribbon ~ School folder ~ E-cut letters ~ Envelope ~ White twine


Cracked Glass Technique

Here is a tutorial on how to do the Cracked Glass Technique from my previous post. For this card, I stamped and cut out the image. You could however, simply cover any watercolored image and get a dramatic effect.

Cracked Glass Technique

Take the image you want to cover and smush (technical term) it down into a Versamark Pad. Versamark Ink is a clear watermark medium that remains wet for a while, so it is perfect for embossing. It has a little bit of a sticky consistency which really grabs embossing powder. You need a clear ink for this technique. Regular embossing ink would work well. Just don’t use a tinted one.

Make sure your image is completely covered with the Versamark.

Cracked Glass Technique

Sprinkle Glassy Glaze Embossing Powder over the entire image. Glassy Glaze is a thick embossing powder. The granules are much larger than in the detailed powders. This powder is preferable, because you want a really thick coat for your final piece. It would take many more coats of a finer powder to achieve the same result. If you don’t have a glassy glaze any clear powder will work, with additional coats.

The next step is to heat the powder until it liquefies, leaving a shiny coating on your piece. You will need a heat gun specifically for this technique. We carry an excellent one in the catalog which is very high quality.

Cracked Glass Technique

If you do not have a heat gun, you can sometimes emboss by heating your piece from the backside over a hot iron.  I don’t suggest it with this technique though, because the very thick coat becomes messy and difficult to work with, and would probably leave a permanent mess on your iron.

I frequently am asked if you can use a blow dryer to emboss and unfortunately, you cannot. A blow dryer doesn’t get hot enough to melt the powder and the fan is too powerful and will blow all of your powder away.

I like to line a box with tin foil and place my piece down inside the box. The foil helps it heat more quickly and evenly and the piece is more contained inside the box.

Cracked Glass Technique

After your powder has melted and cooled, repeat the previous steps 2-3 more times until you have a very thick coating of the shiny glaze.

Cracked Glass Technique

Place your embossed images on a tray of some kind and put them in your freezer.

If you don’t have access to a freezer where you are crafting, you can still get the same effect. You just have to let the images cool and cure till the glaze is hard enough to crack. The freezer speeds up the process.

Cracked Glass Technique

After about 10 minutes in the freezer, slightly bend or twist your piece to make several cracks. The key word here is slightly, too much exuberance in this step can make your glaze lift right off your image.

Refreeze if your piece needs to harden up in a specific area. It will become less brittle, the longer it is out of the freezer.

Cracked glass technique

Your finished piece will take on the lovely look of a cracked piece of glass.

You can rub some dark ink into the crevices for a more antiqued look. The ink will also dull the shine a little, so experiment with this process to get the look you are happy with.

autumn splendor

Here is the finished card.

I hope you get to play with this technique soon. It really adds the WOW, to your artwork.

Happy Stampin’

Belinda

Flight of the Butterfly

Flight of the Butterflies

This is another card from my pop up class. If I used this design again, I would probably add some paper piercing or embossing to the card base. I had already added my inside pop up piece, so I couldn’t do that for this card without starting over!

It is really hard for me to make a card without DSP or embossing, now that I have gotten addicted to both concepts!

The top note die cut is cut in half and used as a layer behind my focal image and the little corner piece has been embossed with a texturz plate and then punched with the Photo Corners punch. The flowers are stamped and cut out and then layered on leaves cut with the little leaves sizzlet die. There is a 1/4 inch punched circle added to the flowers

You can find the tutorial here.

The inside of the card

butterfly pop up

Belinda


Stampin Supplies

Stamps

Flight of the Butterfly ~ Enjoy Every Moment ~ Happy Everything

Ink

Chocolate Chip ~ So Saffron ~ Cameo Coral ~ Certainly Celery

Paper

So Saffron ~ Whisper White ~ Certainly Celery ~ Cameo Coral ~ Retired DSP

Fun Stuff

Big Shot ~ Top Note Die ~ Little Leaves Sizzlet ~ Corner Punch ~ 1/4″ circle punch ~ 5 Petal punch ~ Backgrounds 1 Texturz plate ~ Butterfly Punch


Oldie but Goodie!

Carrot boxes

I love these Carrot Boxes!

These are quick and fun little Easter boxes that we made  at stamp camp this month.  They have been around for awhile, but I bring them back often. They’re just so stinkin’ cute!

carrot box

Print the Carrot Box Pattern onto your card stock

carrot box

Cut on solid lines

carrot box

Score on dotted lines.

carrot box

Stamp using Whisper White Craft Ink.

I used flowers from Cheep Talk and Playful Petals sets, but any spring type image would be cute. You could also stamp tone on tone instead of white or even use bleach. I would place edibles in a cello or plastic bag if using bleach.

Stamp on the print free side of the card stock, the score lines will be on the inside of your box.

carrot box

Add glue to the slim flap. The glue will go on the outside or stamped side and then fold into the box.

carrot box

The Tombow Multi glue grabs quickly and makes a very sturdy bond. You could also use sticky strip tape.

carrot box

Punch holes through both flaps using the 1/8th hole punch and then add strands of curling ribbon to each hole and curl. I used three strands through each hole, each strand about 12 inches long.

Thanks for stopping by!

Belinda


Welcome to my blog!

Welcome to my new website and blog! I am so excited to finally be posting.

The purpose in creating this site was to have a place for you, my wonderful stamping friends to be able to find the wealth of stamping techniques and samples that we have explored over the last 10 years! (I know, I can’t believe it has been that long!) I spend a lot of time surfing the web for ideas and then when I do find something I like, I can never find it again.  So, I wanted a site that was easy to navigate and one which makes it easy to find  what you are looking for. I hope you enjoy it. Please be patient with me as I upload content. I am going to try to update a lot of the stuff I have, but you will also find some old favorites here.

I really had not intended to become a blogger, but I found that this format was the best for what I wanted to do. So, don’t expect posts every day or even every week! When there is something new and exciting at Stampin’ Up! I will post it on my blog and I will post projects here from time to time as well. Some days I will just be posting to the gallery or the tutorial page, and some days I will just be tending to my family, home and customers.  My goal here is to collect a wealth of resources for my wonderful customers. I hope you find it useful. Please feel free to remind me of projects or techniques that you would like to see added.

I want to give many, many thanks to Jen Clendineng for building my site for me and for her patience! I told her what I wanted, and then changed my mind about a hundred times and she built exactly what had been rolling around in my head. How she made any sense of it, I’ll never know! Thanks so much Jen!  Thanks also to Melissa Kulesa for creating my adorable banners.

And now to my first tutorial!

Happy Blessings box

I love my new Big Shot (the new die cut machine and dies from Stampin’ Up!)! I saw a box made from the Scallop Envelope Bigz Die. I don’t know how the original was done, but this is what I came up with.

die cut box

Cut 4 envelopes using the Scallop Envelope Bigz Die.

I have had good luck with cutting through 4-5 pieces of card stock at a time, but for good scored edges I just cut 2 at a time.

die cut box

Cut one of the side flaps off of each die cut. Be sure to remove  the same side each time.

die cut box

Add sticky tape right next to the scored edge of the flap for a good looking edge.

I like to use permanent adhesive for three dimensional projects like this.  Our tombow multi would also work well.

die cut box

Attach each envelope to the next, in the order shown above.

Use a bone folder to get a really good bond.

die cut box

For the bottom, fold in two of the flaps and then add sticky strip to the the bottom two as shown and fold in.

die cut box

You will create an open ended box that has a really cute scalloped edge. I love it!

Happy Stampin’!

Belinda